Geekzone: technology news, blogs, forums
Guest
Welcome Guest.
You haven't logged in yet. If you don't have an account you can register now.


View this topic in a long page with up to 500 replies per page Create new topic
1 | 2 
CapBBeard

211 posts

Master Geek
+1 received by user: 14


  #823860 22-May-2013 23:07
Send private message

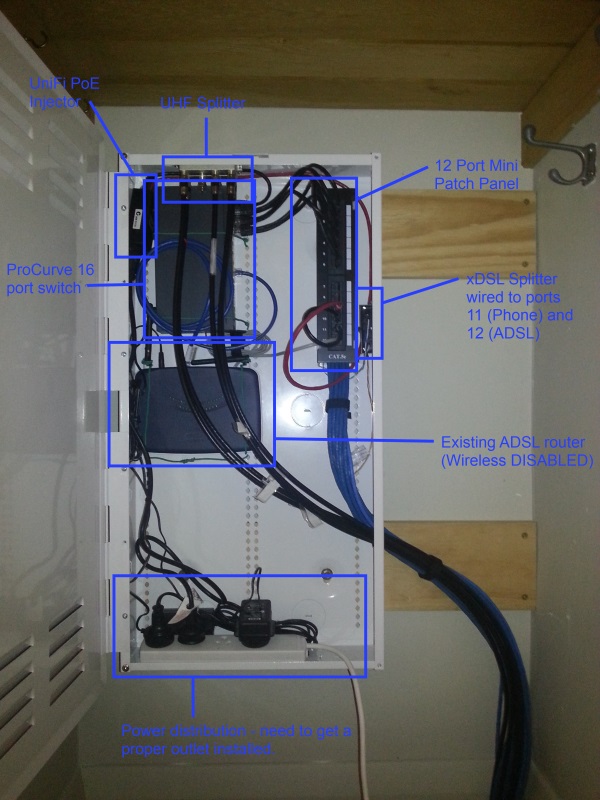
mcraenz: Very tidy CapBBeard. Here's what I did. Easy if you have good crawl space and a wooden floor:
http://blog.rhysgoodwin.com/home-diy/structured-cable-at-home/
http://blog.rhysgoodwin.com/home-diy/structured-cable-at-home-f-patch-panel/


Thanks!

Cheers for the links to your setup, great to see how others have done it. Wow that cupboard looks a perfect fit for that patch panel!

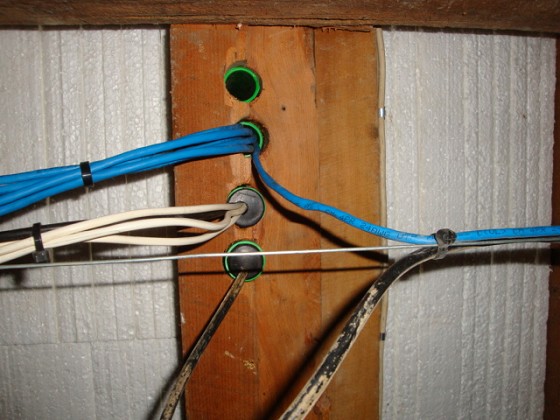
Very clean underfloor job you have there also, mine isn't anything near that tidy! I started out with good intentions but with the limited room to move down there I just settled for rough bundles. I still have to go down there and tidy up the cable slack, I wasn't particularly diligent there but did try and allow approx 1m as per TCF, however it is just hanging near the hole I fed it all through at the moment. I figure I'll just group it where I can and get it well away from the ground.

But again, great work there. Love the channels you've made in the wall, that's awesome :)


mcraenz
1140 posts

Uber Geek
+1 received by user: 222


  #823944 23-May-2013 08:50
Send private message

Cheers! I only wish I'd made the channels wider the one in the left is totally PACKED now!


Help me build a better way of doing politics in Aotearoa New Zealand


DarthKermit
5346 posts

Uber Geek
+1 received by user: 3317

Trusted

  #824213 23-May-2013 16:48
Send private message

^^^

Love your blog pics, you've done some excellent work around your place!

This is how I've done my cables under my house:


This leads up into the cupboard where all the wires terminate.

I have a number of galved steel wires running from point to point, and simply cable tied the network and other cables to them. I didn't use particularly heavy wire so they sag in a few places; so I've suspended the wires mid-way to take up the sag.

The other good thing about the steel wire is you can run it on a diagonal to save a bit of cable length. Smile


Whatifthespacekeyhadneverbeeninvented?


chevrolux
4962 posts

Uber Geek
+1 received by user: 2638
Inactive user


  #824244 23-May-2013 17:49
Send private message

Looks great!

@mcraenz - Good idea building a false wall. We do this in quite a few commercal installs as it makes adding outlets so so much easier. Krone take it one step further and spec that the false wall has to have enough room to walk behind it. Needless to say I haven't seen that happen yet...

@DarthKermit - Good work suspending your cable off catenary's. I find a really good way to support them if they sag is just use a small plastic cable clip every so often on the joist and it keeps the sagging just nicely. That looks like hard old wood too! I feel sorry for your drill lol.

DarthKermit
5346 posts

Uber Geek
+1 received by user: 3317

Trusted

  #824898 24-May-2013 17:51
Send private message

chevrolux: Looks great!

@mcraenz - Good idea building a false wall. We do this in quite a few commercal installs as it makes adding outlets so so much easier. Krone take it one step further and spec that the false wall has to have enough room to walk behind it. Needless to say I haven't seen that happen yet...

@DarthKermit - Good work suspending your cable off catenary's. I find a really good way to support them if they sag is just use a small plastic cable clip every so often on the joist and it keeps the sagging just nicely. That looks like hard old wood too! I feel sorry for your drill lol.


Cheers. I used a heavy duty fencing staple and a cable tie looped through it to reduce the sag on my cable lines.

Yeah, the whole house is old hardwood. Makes drilling a fun exercise at the best of times. I have a number of spade bits that could do with a sharpen!


Whatifthespacekeyhadneverbeeninvented?


mcraenz
1140 posts

Uber Geek
+1 received by user: 222


  #825181 25-May-2013 12:39
Send private message

Yeah nice work DarthKermit. Great idea using the steel cable. Between the Ethernet, power and RG6 I worried I'm going to run out out space on the bearer beams using staples! And I know what you mean about the old hard wood. When I was doing the workshop there were places where I had to drill pilot holes in the Rimu before nailing because it was like trying nail into steel!


Help me build a better way of doing politics in Aotearoa New Zealand


Shop now for Dell laptops and other devices (affiliate link).
webwat
2036 posts

Uber Geek
+1 received by user: 145

Trusted

  #826164 27-May-2013 13:27
Send private message

I ran A cable to this outlet in a cupboard near the master filter, and a cable from there to a bedroom where the modem and router are located. the 2 jacks are jumpered so that the ADSL line actually goes directly to the bedroom but there is the option to put the modem in the cupboard and run Ethernet to the bedroom. I still have modem in the bedroom because thats where the UPS is, so modem is on battery backup.


Time to find a new industry!


sonyxperiageek
2984 posts

Uber Geek
+1 received by user: 397

Trusted

  #974832 26-Jan-2014 21:50
Send private message

CapBBeard:
Hey guys,

Just following up on how this all went for anyone interested. I did grab the Dynamix panel in the end, and threw it in the cupboard as originally planned. You can see the 'almost complete' job below (apologies for the bad quality):

Dynamix Cabinet

Still got a few things to do, such as grabbing a few more patch leads (a few short, plus some are a bit less than ideal, see switch uplink from the ADSL router for example), and getting a proper power outlet installed (I'll need a sparky to do this).

Note that yes, the wireless on the ADSL router is disabled (due to being in a metal box). I have instead set up a UniFi AP in the hall. I hadn't used these before but had heard a lot of great things about them, and I have to say it was extremely easy to get up and running, awesome gear.

For the most part I'm pretty happy with how it all went, and really happy to have all the work under the floor done [!]. Commenting on the Dynamix panel in particular, I was initially quite keen on the modular aspect of it, although after buying their 12 port patch panel that did not fit this layout, plus all my other gear needing mounting in there, I dont think I used a single screw hole in it in the end, except for tie-downs. This is one of the advantages to the Signet boxes that have a regular grid of holes for all manner of equipment. Other than that though it's a nice little unit, and hides away nicely in the back of the cupboard :)

Cheers!


Just wondering, how is the router and switch connected to the box? The switch isn't even on the holes, so how was it mounted on please?

Thanks.


Sony


1 | 2 
View this topic in a long page with up to 500 replies per page Create new topic


Geekzone Live »

Try automatic live updates from Geekzone directly in your browser, without refreshing the page, with Geekzone Live now.


Are you subscribed to our RSS feed? You can download the latest headlines and summaries from our stories directly to your computer or smartphone by using a feed reader.