Geekzone: technology news, blogs, forums
Guest
Welcome Guest.
You haven't logged in yet. If you don't have an account you can register now.


View this topic in a long page with up to 500 replies per page Create new topic
1 | 2 | 3
RickW
302 posts

Ultimate Geek
+1 received by user: 57


  #3434152 13-Nov-2025 16:55
Send private message

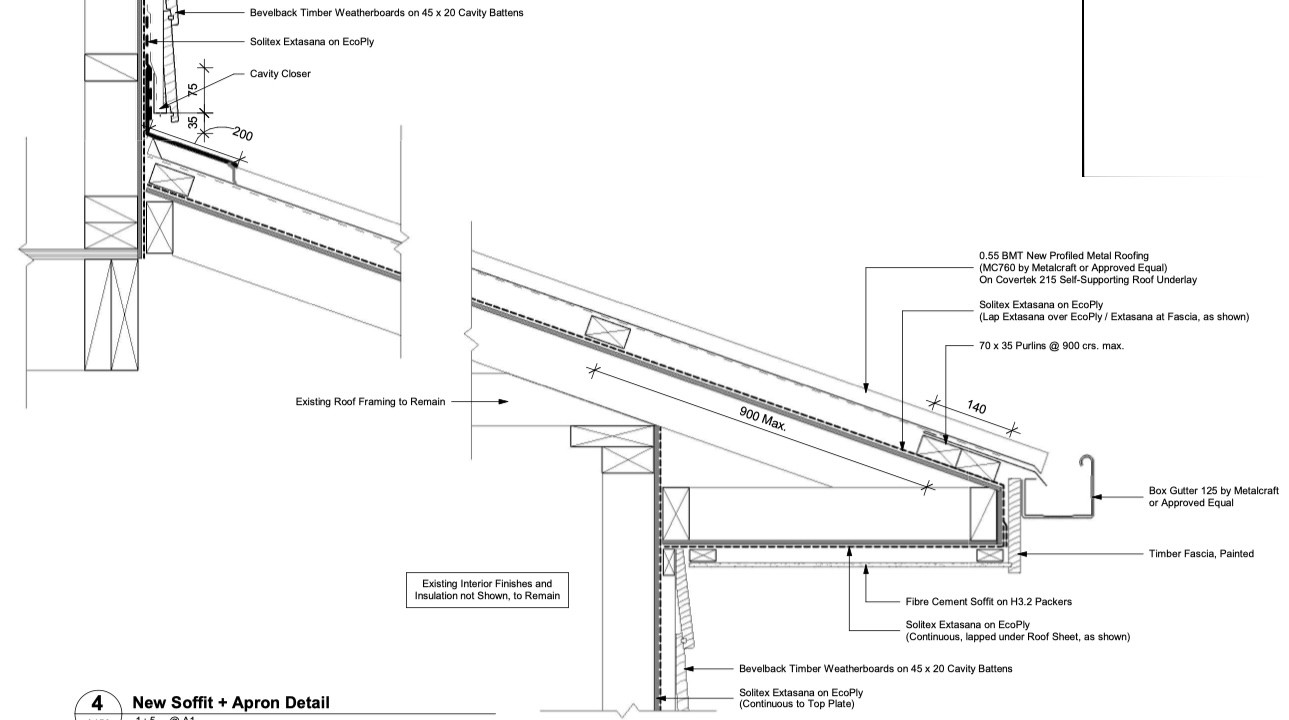
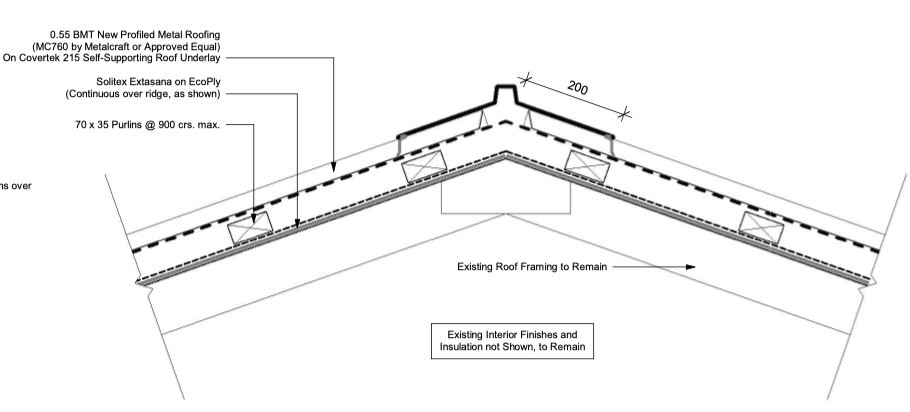
Hey, just to clarify, my post wasn’t intended as a sales pitch, only advice. Covering the insulation with underlay, taping the joins and edges, and stapling it at purlin height greatly reduces wind-washing compared to leaving the insulation fully exposed, like in the Roofing Association diagram.


The correct approach is to have the insulation layer and ceiling space airtight, while still allowing the roof cavity itself to breathe. That’s what this method is trying to achieve in a practical sense.


The reason I included the website link was simply so the OP could contact me for advice if needed, without me posting a personal phone number and risking spam calls.


freitasm
BDFL - Memuneh
80653 posts

Uber Geek
+1 received by user: 41045

Administrator
ID Verified
Trusted
Geekzone
Lifetime subscriber

  #3434727 15-Nov-2025 10:47
Send private message

@tweake I have removed your reply. The member you refer to has been a long-standing participant in discussions.


You are not the Holder of the Truth, and the post in question is not spam. If you have a problem with anything, use the REPORT option and let the moderators deal with it. Do not make it public because you then get a public warning.


Referral links: Quic Broadband (free setup code: R587125ERQ6VE) | Samsung | AliExpress | Wise | Sharesies 


Support Geekzone by subscribing (browse ads-free), or making a one-off or recurring donation through PressPatron.


tweake
2641 posts

Uber Geek
+1 received by user: 1137


  #3434729 15-Nov-2025 10:52
Send private message

freitasm:


@tweake I have removed your reply. The member you refer to has been a long-standing participant in discussions.


fair enough, your call. i usually just remove the mentions of their website and i find 99.9% of those members don't come back, funny that.


tweake
2641 posts

Uber Geek
+1 received by user: 1137


  #3434730 15-Nov-2025 10:55
Send private message

RickW:


Covering the insulation with underlay, taping the joins and edges, and stapling it at purlin height greatly reduces wind-washing compared to leaving the insulation fully exposed, like in the Roofing Association diagram.


The correct approach is to have the insulation layer and ceiling space airtight, while still allowing the roof cavity itself to breathe. That’s what this method is trying to achieve in a practical sense.


the catch with that is billowing. the sealed underlay will flap around with the pressure changes. thats why your method cannot be sealed and why RAB is typically used instead. 


freitasm
BDFL - Memuneh
80653 posts

Uber Geek
+1 received by user: 41045

Administrator
ID Verified
Trusted
Geekzone
Lifetime subscriber

  #3434731 15-Nov-2025 10:55
Send private message

@tweake:


freitasm:


@tweake I have removed your reply. The member you refer to has been a long-standing participant in discussions.


fair enough, your call. i usually just remove the mentions of their website and i find 99.9% of those members don't come back, funny that.


Do you really want to double down and discuss my decision?


The user joined Geekzone 14 years ago and has been posting since then.


Can you just stop being obtuse?


Referral links: Quic Broadband (free setup code: R587125ERQ6VE) | Samsung | AliExpress | Wise | Sharesies 


Support Geekzone by subscribing (browse ads-free), or making a one-off or recurring donation through PressPatron.


timbosan

2199 posts

Uber Geek
+1 received by user: 294

Subscriber

  #3434747 15-Nov-2025 12:46
Send private message

So I thought I would jump back in and try and get this chat back on topic :-)First, I wanted to clarify two things:

1. What I am starting with
2. Where I want to end up

I will also say that the work I am doing is on a cabin, no on the house.  I already have specific products for other work I am doing on the house, namely:

* Extensana
* Intello
* Covertek 215 (self supporting roof underlay)

What I am starting with

I have a cabin, kitset, I built 2 years ago. Its one of these https://www.tradetested.co.nz/p/sheds-carports/garden-studios-cabins/log-cabin-garden-house-iris-3-6m-x-2-7m The 'problem' I am trying to solve is the roof, which consists of internal rafters with 16mm tonge-and-groove and roof felt.  Whilst this is quite waterproof, its absolutely crap at managing heat and noise.

Where I want to end up

I want to 'fix' the roof, but without having to remove or rebuild the existing roof.  The plan I have is to create a new roof space on top of the existing roof.  This lets me keep the nice ceiling inside the cabin (rather than covering with gib).  To achieve this my plan is top:

1. Remove existing felt
2. Lay new 'rafters' on top of the existing roof, 140mm x 45mm
3. Lay down the Intello over the rafters the same way as Datatop in installed https://proclima.co.nz/products/airtightness-systems/dasatop .  I have the tape from Pro Clima to ensure the edges and joins are all sealed.  This will prevent moisture coming up into the new roof space
4. Put in insulation, R4.4 140mm
5. Cover and seal with Extasana
6. Lay 20mm ventilated battens over the Extasana 
7. Lay the Covertek over the ventilated battens
8. Finish with roofing iron, screws through the battens into the 140mm rafters

(I am excluding details such as guttering, fascia boards, barge boards, etc. to focus on the main roof design aspects)

I have been through many BRANZ and Pro Clima documents and designs, and feel this matches nearly all aspects. I have not added purlins under the battens due to the small footprint of the cabin - 10m2, and hence there should be more than enough airflow with just the 20mm battens.

Happy to get input and feedback :-)  I think I have solved all the problems raised by @tweake and clears up for @rickw. For reference here is my starting point from BRANZ:


Shop now at Mighty Ape (affiliate link).
tweake
2641 posts

Uber Geek
+1 received by user: 1137


  #3434750 15-Nov-2025 13:33
Send private message

timbosan:


1. Remove existing felt
2. Lay new 'rafters' on top of the existing roof, 140mm x 45mm
3. Lay down the Intello over the rafters the same way as Datatop in installed https://proclima.co.nz/products/airtightness-systems/dasatop .  I have the tape from Pro Clima to ensure the edges and joins are all sealed.  This will prevent moisture coming up into the new roof space
4. Put in insulation, R4.4 140mm
5. Cover and seal with Extasana
6. Lay 20mm ventilated battens over the Extasana 
7. Lay the Covertek over the ventilated battens
8. Finish with roofing iron, screws through the battens into the 140mm rafters


i think that will do a moderate air tightness. 


i would look at putting intello flat on the existing roof as you can put the rafters on after. that makes it a lot simpler to install and seal.


i would not seal the extasana, leave that open at the edges otherwise you will get billowing. 


its won't be perfectly airtight, but it should reduce most of the air leakage through the roof. but i suspect the rest of the cabin isn't close to being air tight anyway, so its probably not worth the cost to make the roof fully airtight.


RickW
302 posts

Ultimate Geek
+1 received by user: 57


  #3434751 15-Nov-2025 13:34
Send private message

@timbosal


Hey, thanks for the detailed breakdown, that makes it a lot easier to understand what you’re trying to achieve. Your overall plan is solid and you’ve clearly done your homework with the BRANZ and Pro Clima details. Keeping the existing T&G ceiling and building a new ventilated roof system above it is a good approach for these cabins.


There are just a couple of practical points I’d recommend considering before you start:


1. Ventilated cavity, definitely go thicker than 20 mm


Because your top underlay layer (Covertek) will be in contact with the ventilated battens and roofing, it will sag over time, both from moisture cycling and the fact that it’s being fixed into plastic battens rather than timber.
When the steel roofing cools and reaches dew point, the condensation that forms will get absorbed into the underlay, which naturally softens it and increases sag.


If you only have a single 20 mm VB layer, that sagging can bring the underlay into contact with the insulation. Once that happens you lose most of the ventilation path and the system stops working as intended.


I’d strongly recommend doubling up the VB20/VB22 to give you 40 mm of stable clearance.


2. Add twine to reduce underlay sag


Regardless of the cavity height, it’s a good idea to run twine parallel to the roofing sheets, spaced about 150–180 mm apart up the roof. This supports the underlay between the battens and keeps the ventilation path consistent.Some people use hex mesh for this, but twine is better here, the mesh is galvanised, and over time it can abrade the underlay and create compatibility issues with zinc-aluminium roofing.


3. Airtight below / breathable above


Your plan for Intello on top of the new rafters is good, that keeps the internal moisture from migrating upward. Above that, you maintain a continuously ventilated space which is exactly what you want for a skillion-style system.


4. Your overall stack-up is correct


Structurally and thermally, your approach works:


  • Airtight Intello to protect insulation
  • Full-depth insulation
  • Secondary underlay
  • Raised, ventilated cavity
  • Roof underlay
  • Steel roofing

With the two adjustments above (double ventilated battens + twine), it should perform well and not suffer long-term sag or moisture bridging.


As I said above, I'm more than happy to have a quick call to go over the implementation of any details that you might be stuck on, no pressure either way.


RickW
302 posts

Ultimate Geek
+1 received by user: 57


  #3434752 15-Nov-2025 13:57
Send private message

tweake:


RickW:


Covering the insulation with underlay, taping the joins and edges, and stapling it at purlin height greatly reduces wind-washing compared to leaving the insulation fully exposed, like in the Roofing Association diagram.


The correct approach is to have the insulation layer and ceiling space airtight, while still allowing the roof cavity itself to breathe. That’s what this method is trying to achieve in a practical sense.


the catch with that is billowing. the sealed underlay will flap around with the pressure changes. thats why your method cannot be sealed and why RAB is typically used instead. 


I get how you can think that about billowing but you are incorrect. Just to be clear: any roof underlay in a ventilated cavity will move slightly with pressure changes, whether it’s taped or not. That minor movement doesn’t introduce air into the insulation layer if the edges are fixed and the insulation side is kept airtight. The OP isn’t installing a RAB, and nothing in their setup suggests they intend to, they’re working with R4.4 in a 140 mm joist, so we’re talking about practical best-practice for a small shed, not full airtight detailing.


Just to be upfront: based on the tone of your earlier comments (now deleted), I’m not looking to go back and forward with you personally.
Happy to continue helping the OP if they have more questions, though.


timbosan

2199 posts

Uber Geek
+1 received by user: 294

Subscriber

  #3434761 15-Nov-2025 14:21
Send private message

tweake:


timbosan:


1. Remove existing felt
2. Lay new 'rafters' on top of the existing roof, 140mm x 45mm
3. Lay down the Intello over the rafters the same way as Datatop in installed https://proclima.co.nz/products/airtightness-systems/dasatop .  I have the tape from Pro Clima to ensure the edges and joins are all sealed.  This will prevent moisture coming up into the new roof space
4. Put in insulation, R4.4 140mm
5. Cover and seal with Extasana
6. Lay 20mm ventilated battens over the Extasana 
7. Lay the Covertek over the ventilated battens
8. Finish with roofing iron, screws through the battens into the 140mm rafters


i think that will do a moderate air tightness. 


i would look at putting intello flat on the existing roof as you can put the rafters on after. that makes it a lot simpler to install and seal.


i would not seal the extasana, leave that open at the edges otherwise you will get billowing. 


its won't be perfectly airtight, but it should reduce most of the air leakage through the roof. but i suspect the rest of the cabin isn't close to being air tight anyway, so its probably not worth the cost to make the roof fully airtight.


Re your last point "but i suspect the rest of the cabin isn't close to being air tight anyway" - this is the biggest challenge and what stops me from even attempting to make a 'passive cabin'.  However I can do a lot to make it better, and the roof gives the biggest payback.

FYI I do have a plan to insulate the walls with a very similar approach - Intello on the outside of the existing walls, 90x45 framing over that, then Extasana then 11mm ventilated battens. On top will be grooved cladding.  The reason for the 90mm framing and 11mm battens is that the corners of the cabin have 100mm 'overhangs'.

But, the challenge is the way the cabin is designed, I have no way to connect to Intello on the roof to that on the walls, without some major engineering work.  So, its about the best bang for the buck with what I have.

Oh, and I want to enjoy this project, it teaching me a lot!  FYI my 'main' plan is to do "rip the hardboard off the inside of 2 rooms then put mesh + extasana + insulation + line the walls with intello" which I have posted about previously and why I have passive products. 


timbosan

2199 posts

Uber Geek
+1 received by user: 294

Subscriber

  #3434762 15-Nov-2025 14:25
Send private message

tweake:


i would look at putting intello flat on the existing roof as you can put the rafters on after. that makes it a lot simpler to install and seal.


Sorry I wanted to say, I wrote that off is because I have to screw each new rafter into the existing rafters (using a combination of L plates, 12mm bolts, and 10mm screws). I didn't want to do that through the Intello as I thought it was too much, even for Naideck to handle.  Its definitely more work to do that "over each rafter" approach but should yield a better result.

Thanks tweake !!!


Shop now on Samsung phones, tablets, TVs and more (affiliate link).
tweake
2641 posts

Uber Geek
+1 received by user: 1137


  #3434776 15-Nov-2025 16:38
Send private message

timbosan:


FYI I do have a plan to insulate the walls with a very similar approach - Intello on the outside of the existing walls, 90x45 framing over that, then Extasana then 11mm ventilated battens. On top will be grooved cladding.  The reason for the 90mm framing and 11mm battens is that the corners of the cabin have 100mm 'overhangs'.


just a quick thought, why not just do external insulation? i don't know how thick the timber is, basically its what your planning minus the framing. the hard part is making it so the screws don't poke through into the inside of the cabin.


tweake
2641 posts

Uber Geek
+1 received by user: 1137


  #3434778 15-Nov-2025 16:44
Send private message

RickW:


I get how you can think that about billowing but you are incorrect. Just to be clear: any roof underlay in a ventilated cavity will move slightly with pressure changes, whether it’s taped or not. That minor movement doesn’t introduce air into the insulation layer if the edges are fixed and the insulation side is kept airtight. The OP isn’t installing a RAB, and nothing in their setup suggests they intend to, they’re working with R4.4 in a 140 mm joist, so we’re talking about practical best-practice for a small shed, not full airtight detailing.


Just to be upfront: based on the tone of your earlier comments (now deleted), I’m not looking to go back and forward with you personally.
Happy to continue helping the OP if they have more questions, though.


its not about moving air into the insulation. billowing can cause the membrane to break. its basically why house wrap is not tapped/sealed, you need air to move in/out for pressure relief.


timbosan

2199 posts

Uber Geek
+1 received by user: 294

Subscriber

  #3434825 15-Nov-2025 17:05
Send private message

tweake:


timbosan:


FYI I do have a plan to insulate the walls with a very similar approach - Intello on the outside of the existing walls, 90x45 framing over that, then Extasana then 11mm ventilated battens. On top will be grooved cladding.  The reason for the 90mm framing and 11mm battens is that the corners of the cabin have 100mm 'overhangs'.


just a quick thought, why not just do external insulation? i don't know how thick the timber is, basically its what your planning minus the framing. the hard part is making it so the screws don't poke through into the inside of the cabin.


That's what I am planning :-) In the below picture you can see where the walls end up creating an 'overhang' in each corner.  For the end wall (the solid wall on the left of the below) my thinking was to

1. cover the wall with intello and taped off into the corners
2. run 90x455 framing between those end points, which means I can bolt through the end parts and into L plates supporting the framing, running side to side (i.e horizontally). So NO penetrations into the wall :-) 
3. add in some vertical framing where the joins of the new cladding would run
4. insulate between the framing
5. cover the framing with Extasana
6. 11mm ventilated battens on top - this creates a wall that has a cavity in it
7. Cladding

As the framing in 90mm + the 11mm of the battens, this happens to match the depth of the overhangs. So the new cladding would cover the exposed ends of the current walls and be supported by the framing + battens, creating a nice sealed in space.  Oh, there will be a batten running horizontally at the bottom as I cannot find a vermin-stop-thingy that is thinner than 20mm or so.


jjnz1
1371 posts

Uber Geek
+1 received by user: 195

Lifetime subscriber

  #3435486 18-Nov-2025 09:59
Send private message

Wow, this is weird timing.. I too am going through the process of creating an airtight home, as part of my reclad and reroof. I am trying to replicate a build concept called 'monopoly framing', traditionally done using Zip Sheathing in the States.


I am implementing a cavity system on both my walls and roof using EcoPly, then applying solitex extasana adhero from ground up to the ridge line, with NO airgaps. Walls are on 20mm batterns, then timber weatherboards. Roof on <35mm batterns and Covertek 215 underlay with a coloursteel roof. Joinery is uPVC recessed, fully sealed to the rigid airbarrier to prevent air flow.


Due to no passive ventilation in the roof spaces, I am also installing a zehnder ERV, continous fresh air ventilation, which along with my ducted heatpump, will allow me to have conditioned (temp and humidity controlled) roof spaces, as well as fresh air in all my rooms. This has the added benefit that my AC duct work will also be in a conditioned air space, to reduce losses and maximise efficiency.


The only piece of the puzzle I am missing (and purposely not spec'd in the council consent docs) is the rigid air barrier on the roof.. Normal spec's require a minimum of 15 or 17mm ply from memory, but because I am using colour steel roofing, I am hoping to see if EcoPly will endorse using the 7mm EcoPly Barrier product. The purpose of this layer is not structural, as it only serves as an air barrier.


1 | 2 | 3
View this topic in a long page with up to 500 replies per page Create new topic


Geekzone Live »

Try automatic live updates from Geekzone directly in your browser, without refreshing the page, with Geekzone Live now.


Are you subscribed to our RSS feed? You can download the latest headlines and summaries from our stories directly to your computer or smartphone by using a feed reader.