Geekzone: technology news, blogs, forums
Guest
Welcome Guest.
You haven't logged in yet. If you don't have an account you can register now.


timbosan

2199 posts

Uber Geek
+1 received by user: 294

Subscriber

#322722 16-Sep-2025 11:25
Send private message

Hey all,

So, as part of my plans for a new roof for my cabin (one of these Log Cabin Garden House Iris 3.6m x 2.7m - Cabins & Studios - Sheds & Carports at Trade Tested ) I am going to add a new roof.  This will be laid on top of the existing roof, which is just 20mm timber and felt, so no insulation and crap found sound. Oh, and it leaks (another story for another day).

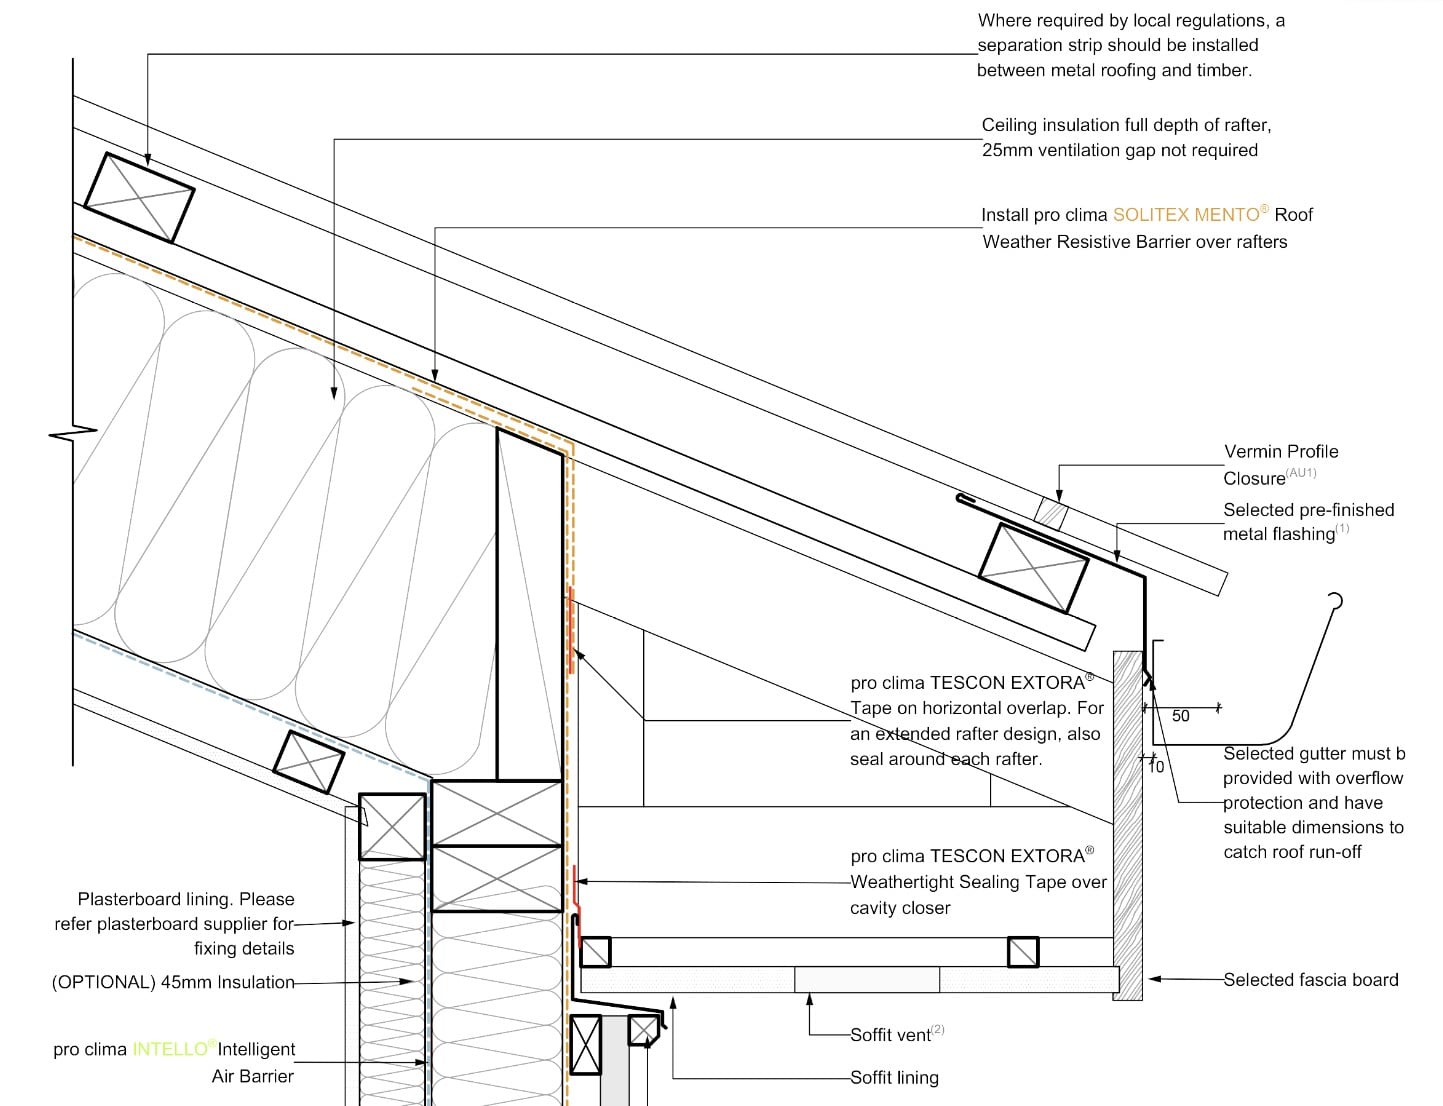
At the same time I have been speaking with Pro Clima about some passive house products for renovations to the house, and they mentioned I could use their Intello and Extasana to create an air-tight roof space that doesn't need the tradition 25mm gap between the insulation and the roofing paper.  This would allow me to move from R3.2 to R4.4 insulation with 140mm rafters. Seeing as I will already have the products, this seems like a free bonus.

Anyone done something similar?  I understand the key here is the Intello being an air barrier, as the existing roof is basically tongue-in-groove and hence the barrier is needed to keep moisture from transferring through the wood and into the insulation.  FYI the insulation is just batts and I would be removing the felt on the roof as well.


View this topic in a long page with up to 500 replies per page Create new topic
 1 | 2 | 3
peng1nz
49 posts

Geek
+1 received by user: 15


  #3415468 16-Sep-2025 20:02
Send private message

I've not done it myself but I think you will most likely want to ventilate the insulation/roof. You can still have the room 'airtight'.


I am sure the folk at Proclima will set you right but a couple of resource I can recommend are;


  1. How to deal with roof space moisture: https://www.buildmagazine.org.nz/articles/show/roof-space-moisture-its-complicated
  2. The High Performance Construction Details Handbook. (see page 77).  Book available for download here: https://passivehouse.nz/hpcd-handbook/


Keen to hear what you end up with.


timbosan

2199 posts

Uber Geek
+1 received by user: 294

Subscriber

  #3415554 17-Sep-2025 10:48
Send private message

peng1nz:


I've not done it myself but I think you will most likely want to ventilate the insulation/roof. You can still have the room 'airtight'.


I am sure the folk at Proclima will set you right but a couple of resource I can recommend are;


  1. How to deal with roof space moisture: https://www.buildmagazine.org.nz/articles/show/roof-space-moisture-its-complicated
  2. The High Performance Construction Details Handbook. (see page 77).  Book available for download here: https://passivehouse.nz/hpcd-handbook/


Keen to hear what you end up with.


Yeah, it's strange, as the diagrams show NO ventilation of the roof space, and a specific note that "25mm ventilation gap not required". I am going to double check with Pro Clima as I want to pick the Intello and Extasana this week for other projects.  Plus getting extra insulation for 'free' would be fantastic!


timbosan

2199 posts

Uber Geek
+1 received by user: 294

Subscriber

  #3417397 22-Sep-2025 13:47
Send private message

So, I went out to the Pro Clima showroom in Penrose.  For anyone thinking of anything related to Passive products, I highly recommend a visit.  They are very helpful, have a mockup of a house and pullout 'boards' showing examples of how to install, for example the "insulation walls of existing house" with the Mesh / Extasana / Insulation / Intello solution.  But that's later on, for the time being it's the cabin.  I asked them about the plans for the 140mm rafters and insulation, and they agreed it would work, only two callouts are:


  1. leave a ventilation gap between the iron and the Extasana, so I will be using 11mm ventilated battens for that job
  2. Put the Intello OVER the rafters


that means


1) remove the felt
2) fit and attach rafters direct to the existing tongue-and-groove 'roof'
3) Intello (using the Dasatop installation method)
4) Insulation
5) Extasana
6) Ventilated battens with Naideck (Naideck goes under the battens and seals any penetrations in the Extasana from nails and screws)
7) Iron
8) Beer!

So, not too different than any other roof, just the products are different but the general process is the same.  The products are slightly more expensive, but at least I know it will last and we warm and dry :-)

Photos will be posted if anyone is interested.


mattwnz
20515 posts

Uber Geek
+1 received by user: 4794


  #3417398 22-Sep-2025 13:56
Send private message

Where is the roof underlay in that detail? It is supposed to drain into the gutter is my understanding


timbosan

2199 posts

Uber Geek
+1 received by user: 294

Subscriber

  #3417416 22-Sep-2025 14:51
Send private message

mattwnz:


Where is the roof underlay in that detail? It is supposed to drain into the gutter is my understanding


Good question! The Extasana is the underlay, but it is taped against the house so I will ask!   I think it might be related to this statement from Pro Clima: "because MENTO is a non-porous underlay it will not wick moisture like the micro porous wraps do".  I am substituting Extasana for Mento


tweake
2641 posts

Uber Geek
+1 received by user: 1137


  #3417474 22-Sep-2025 17:42
Send private message

imho the above is a hack version. the drawing is actually right but description isn't.


you don't really want loose air tight membranes on the outside/top as it will bellow and flap, and eventually tear. this is why standard house wrap isn't sealed around the outside. you want to have a rigid air barrier (which is in the drawing), ie sheathing. eg you remove the roof, lay down plywood, tape for air sealing, lay down the mento or other layment. then install purlins +drainage gap, lay down roofing layment then iron on that.


the mento or other layment is really just there to protect the plywood. its the plywood thats the air seal.


intello of course goes on the inside under the gib and that needs to be sealed especially arounds lights etc. its more of a 2ndary air barrier.


Shop now for Lenovo laptops and other devices (affiliate link).
tweake
2641 posts

Uber Geek
+1 received by user: 1137


  #3417512 22-Sep-2025 19:19
Send private message

to add: you also need to add a vapor port at the ridge. moisture gets carried by warm air up to the high point and moisture gets concentrated there.


also you can get stick on membranes and also preapplied systems, eg zip systems, the osb with green membrane on it. however zip has pretty low permeability, i would recommend a high permeability membrane. i did find one on plywood here many years back, no idea if it still exists.


timbosan

2199 posts

Uber Geek
+1 received by user: 294

Subscriber

  #3417870 23-Sep-2025 13:51
Send private message

@tweake - Your answers always give me a mixture of insight, and of dread as I think "oh no - what I missed now!" ;-) I am really appreciative of all your help and answers with the many posts I have made.  So, I thought I would add some clarify to my plans, as I have re-read the posts on this thread, and I believe I have it right, but maybe just wasn't clear.

First off - the existing cabin.  I linked in the original post, and the current 'roof' is just tongue-and-groove timber ( 20mm I guess) covered by felt.  That's it.  Over time the felt have torn in a few places and hence there have been a couple of leaks, which I have patched.  However two problems remain:

1) Noise
2) Summer heat and winter cold

So, the plan is to add a 'proper' roof on top of the existing, effectively making the existing roof the ceiling of the cabin.  This new roof would have rafters laid on of the of the tongue-and-groove, bolted into the existing rafters under the existing roof.

I looked into this a lot, primarily based on this design from BRANZ (issue 630):


At the same time, I have been planning on making the house more airtight (it's an old home and will never be airtight, but there is a lot of scope for improvement).  This led me down the Pro Clima route, and to purchasing their products for the house.  Due to the overlap in products need to roof the cabin, I decided to also apply the Pro Clima products to the cabin.

This is one of the examples I saw at my visit to Pro Clima, a 'top down' approach to roofing.  The key here is the barrier goes OVER the rafters, which is the plan I am following:


The Intello is substituted for the Dasatop, and then the Extasana becomes the roof underlay.

Re the comment 'you don't really want loose air tight membranes on the outside/top as it will bellow and flap' - as the Extasana is both stapled and taped, then has ventilated battens laid on top, and then the roof screwed into the battens and the rafters, and the space below is filled with batts (140mm) I don't think there will be any movement of the underlay.

Re the vapour port at the right, I assume you are talking about the ventilation gap behind the fascia boards, as shown in the BRANZ image?  Given that Extasana doesn't wick moisture (according to Pro Clima) this shouldn't be a problem.

Happy to be corrected!


mattwnz
20515 posts

Uber Geek
+1 received by user: 4794


  #3417930 23-Sep-2025 14:51
Send private message

One thing about that diagram , which is shown on the Branz one, is how the metal roof is isolated from the timber purlins. My understanding is that you must not have metal roofing in direct contact with treated timber, and I believe that is likely stated in the warranty on some of these products. But the other detail about only talks about 'local regulations' may require a separation, which I am assuming is local TAs. I think it is in the Metal roofing associations code of practice , and hence the NZBC and  E2 which refers to it, that there needs to be a separation to prevent corrosion between the treated timber and metal. Normally that is the roofing underlay, as per the BRANZ detail, and if any water via leaks, or condensation on the underside , it goes onto the underlay and can drain down, and to the outside, into the gutter. Which is not shown on the other detail, where it looks like it would end up inside the soffit.  


timbosan

2199 posts

Uber Geek
+1 received by user: 294

Subscriber

  #3418019 23-Sep-2025 17:06
Send private message

mattwnz:


One thing about that diagram , which is shown on the Branz one, is how the metal roof is isolated from the timber purlins. My understanding is that you must not have metal roofing in direct contact with treated timber, and I believe that is likely stated in the warranty on some of these products. But the other detail about only talks about 'local regulations' may require a separation, which I am assuming is local TAs. I think it is in the Metal roofing associations code of practice , and hence the NZBC and  E2 which refers to it, that there needs to be a separation to prevent corrosion between the treated timber and metal. Normally that is the roofing underlay, as per the BRANZ detail, and if any water via leaks, or condensation on the underside can drain down, and to the outside, into the gutter. Which is not shown on the other detail, where it looks like it would end up inside the soffit.  


Interesting, I wasn't aware of that! But it makes sense.  Luckily I am planning on these ventilated battens, which are not wood.  https://www.bunnings.co.nz/masons-45-x-18-x-1800mm-blue-ventilated-roof-batten_p0751803. These will sit over the Extasana and then the iron on top of the battens.  I will run at least 3 lengths (maybe 4 depending of the orientation of the insulation - this one https://www.bunnings.co.nz/earthwool-glasswool-r4-4-140-x-580-x-1160mm-4m-wall-insulation-batt_p0410679 )


tweake
2641 posts

Uber Geek
+1 received by user: 1137


  #3418033 23-Sep-2025 17:50
Send private message

timbosan:


@tweake - Your answers always give me a mixture of insight, and of dread as I think "oh no - what I missed now!" ;-) I am really appreciative of all your help and answers with the many posts I have made.  So, I thought I would add some clarify to my plans, as I have re-read the posts on this thread, and I believe I have it right, but maybe just wasn't clear.

First off - the existing cabin.  I linked in the original post, and the current 'roof' is just tongue-and-groove timber ( 20mm I guess) covered by felt.  That's it.  Over time the felt have torn in a few places and hence there have been a couple of leaks, which I have patched.  However two problems remain:

1) Noise
2) Summer heat and winter cold

So, the plan is to add a 'proper' roof on top of the existing, effectively making the existing roof the ceiling of the cabin.  This new roof would have rafters laid on of the of the tongue-and-groove, bolted into the existing rafters under the existing roof.

I looked into this a lot, primarily based on this design from BRANZ (issue 630):


At the same time, I have been planning on making the house more airtight (it's an old home and will never be airtight, but there is a lot of scope for improvement).  This led me down the Pro Clima route, and to purchasing their products for the house.  Due to the overlap in products need to roof the cabin, I decided to also apply the Pro Clima products to the cabin.

This is one of the examples I saw at my visit to Pro Clima, a 'top down' approach to roofing.  The key here is the barrier goes OVER the rafters, which is the plan I am following:


The Intello is substituted for the Dasatop, and then the Extasana becomes the roof underlay.

Re the comment 'you don't really want loose air tight membranes on the outside/top as it will bellow and flap' - as the Extasana is both stapled and taped, then has ventilated battens laid on top, and then the roof screwed into the battens and the rafters, and the space below is filled with batts (140mm) I don't think there will be any movement of the underlay.

Re the vapour port at the right, I assume you are talking about the ventilation gap behind the fascia boards, as shown in the BRANZ image?  Given that Extasana doesn't wick moisture (according to Pro Clima) this shouldn't be a problem.

Happy to be corrected!


i think what they are doing is horrid.


the dasatop going over the rafters is ok. tho i your case you could put dasatop on top of the t&g before you put the rafters on, which is better and cheaper.


the  Extasana is a poor way of doing. having it flex is asking for problems. i have never seen anyone use flexable membrane as an air barrier and the super highly qualified expert i spoke to many many years ago said it was a bad idea.  also its not the roof underlay. the roofing underlay goes directly under the iron. thats just a normal underlay used in normal fashion.


the proper way is to use rab. rigid air barrier. eg put ply wood on top of the rafters, use for eg EXTASANA ADHERO and stick that onto the plywood.


vapor port is up at the ridge line. moisture goes up and collects at the ridge. rab isn't great at allowing a ton of moisture through. so they use a small strip of straight membrane at the ridge. (there is calcs around for size etc). 


vapor port


Move to New Zealand's best fibre broadband service (affiliate link). Free setup code: R587125ERQ6VE. Note that to use Quic Broadband you must be comfortable with configuring your own router.
timbosan

2199 posts

Uber Geek
+1 received by user: 294

Subscriber

  #3418039 23-Sep-2025 18:03
Send private message

Hmmm, I wonder how they (Pro Clima) sell and promote these solutions? As a supplier don't they need to meet standards, like AS2 etc. (sorry I don't know what the standards are).  They run training workshops, so wonder how they deal with that?

So, if I was to change my approach, would the below be better?  Ideally I don't really want to have to buy a new roll of roofing underlay and only use 20% of it (most are 50m2 or more).

The Intello plan stays the same going over the new rafters (less penetrations through the Intello this way as the new rafters need to screw through the existing roof)
Move away from the R4.4 140mm insulation with 140mm rafters and go with something like 105mm R3.2 which gives the recommended 25mm ventilation gap (as per the BRANZ image)
Battens on top of the rafters
Put Extasana on top of the battens
Roofing on top of the Extasana

I know it's not ideal but much closer to the BRANZ image, and I am trying to work with what I have.  It's "just a cabin" but I don't want to create problems! Again, appreciate all the input and feedback :-)


timbosan

2199 posts

Uber Geek
+1 received by user: 294

Subscriber

  #3418076 23-Sep-2025 19:11
Send private message

Actually, I just read BRANZ Bulletin 610, which contains the following image (from https://d39d3mj7qio96p.cloudfront.net/media/documents/BU610-Skillion-Roofs-v2.pdf


This is exactly what I am trying to do.  I have a roof with the rafters under the tongue-and-groove ceiling. Then I will put the air barrier (the Intello) on TOP of the ceiling as per the diagram.

From there I differ in that I will put 140mm rafters on top of the roof with insulation to full height (in the diagram this is the height of the purlins), and then ventilated battens on top to give the 25mm gap (I might need to change products to get this, my planned ones are 18mm).

Finally, Extasana as underlay and the metal roofing.  Not quite 100% (mainly due to the Extasana) but 90% close to E2 / AS1.

I just then need to work out the ventilation, which will probably be at the soffits.  


tweake
2641 posts

Uber Geek
+1 received by user: 1137


  #3418083 23-Sep-2025 19:28
Send private message

timbosan:


Actually, I just read BRANZ Bulletin 610, which contains the following image (from https://d39d3mj7qio96p.cloudfront.net/media/documents/BU610-Skillion-Roofs-v2.pdf


This is exactly what I am trying to do.  I have a roof with the rafters under the tongue-and-groove ceiling. Then I will put the air barrier (the Intello) on TOP of the ceiling as per the diagram.

From there I differ in that I will put 140mm rafters on top of the roof with insulation to full height (in the diagram this is the height of the purlins), and then ventilated battens on top to give the 25mm gap (I might need to change products to get this, my planned ones are 18mm).

Finally, Extasana as underlay and the metal roofing.  Not quite 100% (mainly due to the Extasana) but 90% close to E2 / AS1.

I just then need to work out the ventilation, which will probably be at the soffits.  


downs sides to that is air barrier is on the wrong side of the insulation. generally you want air barrier on the outside so wind doesn't blow around air down and around the insulation. also getting a really good air seal on the t&g will be interesting. you will need to glue it down around the edges and fill up any gaps on those edges. you will need to get the right sealant that sticks to the membrane.


the typical air sealing approach is rab on the outside and membrane on the inside.


don't forget you will also need to work out how to bring that air barrier down the top plate. ie join up the wall to the roof.


RickW
302 posts

Ultimate Geek
+1 received by user: 57


  #3434115 13-Nov-2025 14:51
Send private message

Hi there, hopefully this isn’t too late to help, first of all, the reply is fairly long but I have tried to explain the reasons why id do it that way and my thought process a little bit to help out.
I’m Rick from Winter and Son Roofing, I've got 15 years experience in the roofing industry. For a sealed skillion roof like the one you’re describing, the RANZ details are pretty close to how I’d approach it.


Firstly, question, what is the roof pitch?


This is important, as the pitch affects how condensation and ventilation behave in a skillion setup.

My recommended approach if the roof is 25º or greater


I’d go with two layers of underlay, each serving a different purpose:


  1. First layer (on top of the purlins):


    • Acts as a primary barrier to wind and dust, helping to maintain insulation performance.
    • Must be vapour-permeable so any trapped moisture can still escape.


  1. Ventilated cavity (using VB20 battens):


  1.  

    • I’d double up on the VB20 to create around 40 mm of clearance.
    • This extra gap accounts for natural sagging of the upper underlay when condensation forms on the underside of the roofing.
    • Since the underlay is fixed to plastic battens, it will never be pulled fully tight as well so will sag a little because of this too.


  1. Reducing underlay sag:


  1.  

    • Run twine ontop of the vb20 parallel to the roofing sheets, spaced about 150-180 mm apart up the roof.
    • This helps support the underlay and reduces sagging.
    • Some people use hex mesh, but I don’t recommend it, being galvanised steel, it’s not compatible with zincalume based roofing and can wear through the underlay over time, leading to corrosion or premature failure.


  1. Top layer of underlay:


  1.  

    • Install this layer over the twine.
    • Cut it flush with the top edge of the upper purlin, don’t run it up and over.
    • This allows condensation moisture to escape properly through the ridge.


  1. Final layer:


  1.  

    • Install your roofing sheets over that, and finish with a ventilated ridge cap to complete the airflow path.
    • please note because of the extra 40 mil of VB20 the 12 gauge T17 55mm or 65mm screws (depending on the roofing profile selected) will not be sufficient and you will have to move up to a t17 14 gauge 100mm or 110mm screws. this will require a 3/8 tekbit not the standard 5/16 tekbit.
    •  

      Also, don’t install profile foam at the bottom of the roof. It might seem helpful for keeping out birds or rodents, but in reality it’s a waste of time, they’ll just pull it out or chew through it. Even worse, it blocks the natural airflow that the roof needs to manage condensation up the rib where there's minimal airflow due to the underlay blocking it.


      If you want to properly bird- or rodent-proof the eaves, the right approach is to fold pieces of flat metal to match the shape of the roofing profile. This blocks the rib openings effectively. Add a 90° fold along the bottom edge so it forms an angle that can be secured with the bottom row of roof fixings. Finally, drill around ten 4 mm holes in each section to maintain airflow through the roof cavity.


    • Ensure the sheets have the pans folded up at the top of the sheets to block driving rain.


If you have any questions and need more clarification feel free to give us a call and ill try and post notes here to help others out, the contact information is on the Winter and Son Roofing website https://wsr.co.nz 


 1 | 2 | 3
View this topic in a long page with up to 500 replies per page Create new topic


Geekzone Live »

Try automatic live updates from Geekzone directly in your browser, without refreshing the page, with Geekzone Live now.


Are you subscribed to our RSS feed? You can download the latest headlines and summaries from our stories directly to your computer or smartphone by using a feed reader.