Geekzone: technology news, blogs, forums
Guest
Welcome Guest.
You haven't logged in yet. If you don't have an account you can register now.


johno1234

3487 posts

Uber Geek
+1 received by user: 2978


#324748 20-May-2026 09:15
Send private message quote this post

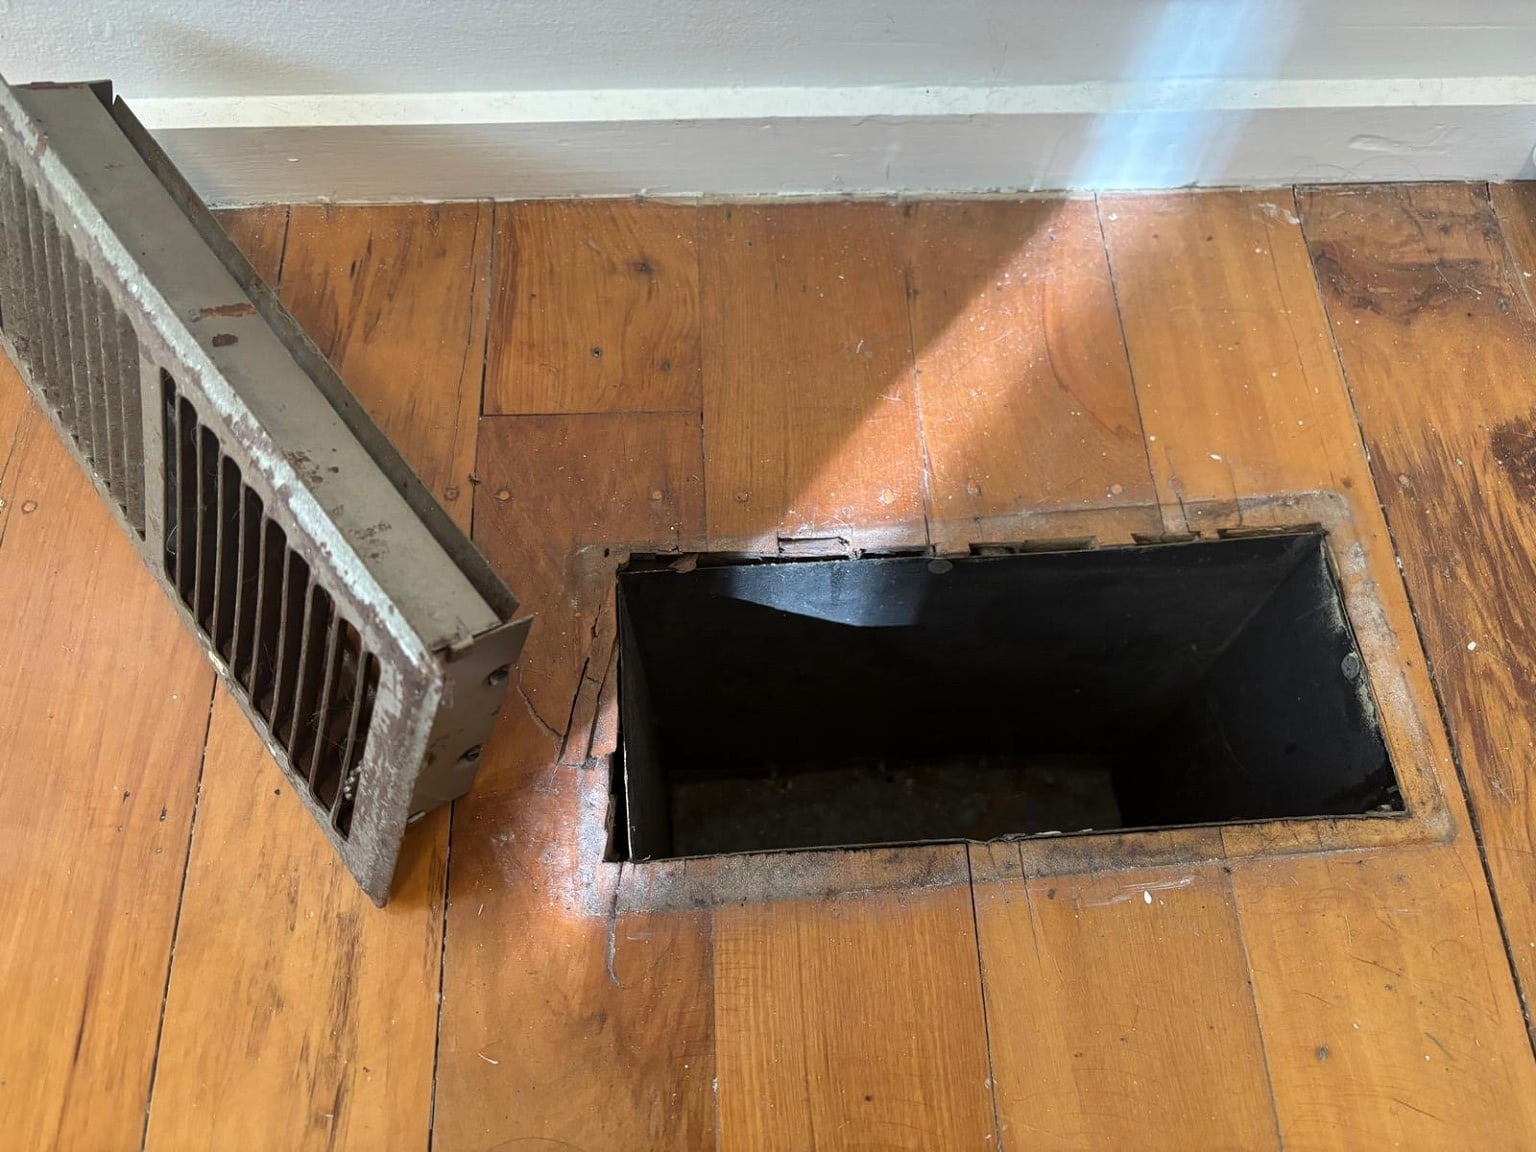
I have retired our basement ducted heating system. It has floor vents in every room with grilles that sit in a floor register boot with rectangular cutout typically about 250x100. The floor register boot underneath is made of galv steel and quite deep.


Several of the rooms are about to be re-carpeted so I want to remove the grilles, cover/blank the holes and carpet over. Just need something simple and inexpensive that won't move around, flex or draught. 


Am thinking of 1mm alu plate bonded to plywood - so the plywood block fits snug into the opening and the plate overlaps and is screwed down. The plywood to stiffen it so it wont flex. 


Is that dumb or is there a better simpler way?


Filter this topic showing only the reply marked as answer View this topic in a long page with up to 500 replies per page Create new topic
 1 | 2 | 3
MikeAqua
8205 posts

Uber Geek
+1 received by user: 3958


  #3493936 20-May-2026 09:53
Send private message quote this post

That's not dumb at all, but you may feel the aluminium plates (or any fastener's you use) through the carpet.  Also ... is there a risk the alloy plate will bend up aoud the edges (where it overhangs the plywood) causing the infill pieces to sink over time?


If the cutouts in the floor are through wood, and thick enough then ... you could rout a rebate around the edge of each cutout. That would allow you to recess the plywood pieces so that are flush with the floor.  The rebate depth should be equal to the thickness of the plywood.  I'd glue them as well, so they don't move.


What I'm suggesting is a little more complex.  You'd need a handheld router, a bit and a straight edge.  But if it's possible to do it this way, that would be a more solid durable solution.


I may not have understood your description correctly, so I could be completely off.  A photo would be helpful.


Mike


eracode
Smpl Mnmlst
9461 posts

Uber Geek
+1 received by user: 6343

ID Verified
Trusted
Lifetime subscriber

  #3493937 20-May-2026 09:54
Send private message quote this post

Sounds good. At 250x100 you could also use 18mm pine or MDF - unlikely to flex esp if bonded to the alu and if the alu overlaps the floor well.


I’d have the 1mm alu overlap the edges of the void by about 20mm all around if possible - and glue it to the floor with construction adhesive. I think it’s unlikely you’d feel the 1mm through underlay and carpet. Having said that, the @MikeAqua approach is good too.


Sometimes I just sit and think. Other times I just sit.


johno1234

3487 posts

Uber Geek
+1 received by user: 2978


  #3493993 20-May-2026 12:16
Send private message quote this post

Thanks for the above. Mike's solution is very good but probably a bit too hard for me. 


pdh

pdh
498 posts

Ultimate Geek
+1 received by user: 346


  #3494015 20-May-2026 13:22
Send private message quote this post

If you are willing to use a decent glue, there's no need for any routing, or any overhanging ali plate.


I use a lot of epoxy and a bead of decent epoxy around the edges of an 18mm thick 'inset lid', once cured, would let you drive a car over it.


By 'inset lid' I mean a rectangle cut to drop into the register and lie flush with the floor.


If there's a possibility of it falling into the hole, screw on a temporary cross piece - a short stick of say 20x40 mm (cross-section) to overlap the edges of the hole and keep the 'lid' flush with the floor until the epoxy sets up.


Done.


MikeAqua
8205 posts

Uber Geek
+1 received by user: 3958


  #3494035 20-May-2026 14:24
Send private message quote this post

pdh:


If you are willing to use a decent glue, there's no need for any routing, or any overhanging ali plate.


I use a lot of epoxy and a bead of decent epoxy around the edges of an 18mm thick 'inset lid', once cured, would let you drive a car over it.


By 'inset lid' I mean a rectangle cut to drop into the register and lie flush with the floor.


If there's a possibility of it falling into the hole, screw on a temporary cross piece - a short stick of say 20x40 mm (cross-section) to overlap the edges of the hole and keep the 'lid' flush with the floor until the epoxy sets up.


Done.


This is a great idea.  Just make sure you use tape on your holding sticks - so they don't end up glued in place.


The only possible issue I can see is expansion and contraction of your flooring due to changes in humidity.  That would depend very much on your floorign type


And also beware of the greed of end grain for adhesives (only relevant to some flooring types).  Won't be an issue if you're using thickened epoxy, which is what I assume pdh is referring too.


Mike


kiwi_64
278 posts

Ultimate Geek
+1 received by user: 149

Subscriber

  #3494047 20-May-2026 14:41
Send private message quote this post

If you have underfloor access, why not stick to your original plan (1mm alu plate bonded to plywood) but attach from the other side (i.e. underfloor) to avoid the risk of seeing/feeling the alu plate?


Shop now for Lego sets and other gifts (affiliate link).
johno1234

3487 posts

Uber Geek
+1 received by user: 2978


  #3494050 20-May-2026 14:55
Send private message quote this post

Underfloor access is OK in most of the rooms but there's the ducting and register boots in the way - would be a lot of work to remove them to get access to the floor below the hole.


johno1234

3487 posts

Uber Geek
+1 received by user: 2978


  #3494053 20-May-2026 15:07
Send private message quote this post

pdh:


If you are willing to use a decent glue, there's no need for any routing, or any overhanging ali plate.


I use a lot of epoxy and a bead of decent epoxy around the edges of an 18mm thick 'inset lid', once cured, would let you drive a car over it.


By 'inset lid' I mean a rectangle cut to drop into the register and lie flush with the floor.


If there's a possibility of it falling into the hole, screw on a temporary cross piece - a short stick of say 20x40 mm (cross-section) to overlap the edges of the hole and keep the 'lid' flush with the floor until the epoxy sets up.


Done.


How much of a gap will the epoxy cope with? Whoever installed the boots (perhaps in the 80's) did a very rough job that is covered by the register. The fill-in block will need to fit into the register boot which would be quite gappy. Or if were to remove the boots I would have to re-cut the holes to make them square and tidy. I guess I could pull the screws and just push the boot down out of the way.


You can see why I'm liking the plate and stiffening block idea:


MikeAqua
8205 posts

Uber Geek
+1 received by user: 3958


  #3494059 20-May-2026 15:23
Send private message quote this post

That's a tough situation.  Can you use a Dremel and cutting discs to cut them back?  then you could insert and glue plywood as pdh suggested.  An old deck of playing cards as shims can be your friend, to get things nice and level.  


Or ... can you rivet some angle section to the inside of the duct to support plywood inserts?


Mike


johno1234

3487 posts

Uber Geek
+1 received by user: 2978


  #3494066 20-May-2026 15:30
Send private message quote this post

MikeAqua:


That's a tough situation.  Can you use a Dremel and cutting discs to cut them back?  then you could insert and glue plywood as pdh suggested.  An old deck of playing cards as shims can be your friend, to get things nice and level.  


Or ... can you rivet some angle section to the inside of the duct to support plywood inserts?


That's a good idea.


eracode
Smpl Mnmlst
9461 posts

Uber Geek
+1 received by user: 6343

ID Verified
Trusted
Lifetime subscriber

  #3494082 20-May-2026 16:12
Send private message quote this post

MikeAqua:


Or ... can you rivet some angle section to the inside of the duct to support plywood inserts?


IMO a very tricky job to get the angle sections located with the positional accuracy that you would need to get this wholly right - working with pieces of angle and (presumably) a pop riveter down in the hole within 1mm accuracy.


How would you drill the holes in the duct for the rivets along the long side of the 100 mm wide opening - no room for the drill to fit in the cavity? Unless I’m missing something here.


Sometimes I just sit and think. Other times I just sit.


Shop now on Samsung phones, tablets, TVs and more (affiliate link).
johno1234

3487 posts

Uber Geek
+1 received by user: 2978


  #3494087 20-May-2026 16:20
Send private message quote this post

eracode:


MikeAqua:


Or ... can you rivet some angle section to the inside of the duct to support plywood inserts?


IMO a very tricky job to get the angle sections located with the positional accuracy that you would need to get this wholly right - working with a pop riveter down in the hole within 1mm accuracy.


How would you drill the holes in the duct for the rivets along the long side of the 100 mm wide opening - no room for the drill to fit in the cavity?


I happen to have a 90 degree drill but even it might not fit. I think I've used it once in the few years I've owned the thing.


eracode
Smpl Mnmlst
9461 posts

Uber Geek
+1 received by user: 6343

ID Verified
Trusted
Lifetime subscriber

  #3494324 21-May-2026 08:05
Send private message quote this post

MikeAqua:


.. you could rout a rebate around the edge of each cutout. That would allow you to recess the plywood pieces so that are flush with the floor.  The rebate depth should be equal to the thickness of the plywood.  I'd glue them as well, so they don't move.


What I'm suggesting is a little more complex.  You'd need a handheld router, a bit and a straight edge.  But if it's possible to do it this way, that would be a more solid durable solution.


Looking at the the photo now showing, looks like this could not work. The top edges of the floor box come up to floor level - which would preclude use of the router to make a recess (unless some or all of the box was removed first).


Sometimes I just sit and think. Other times I just sit.


pdh

pdh
498 posts

Ultimate Geek
+1 received by user: 346


  #3494458 21-May-2026 13:44
Send private message quote this post

Here's a sketch of what I suggested earlier - epoxy & ply solution.


The size & precise fit of the ply is less about strength/gap filling and more about saving you money - epoxy is dearer than plywood.


There are some pre-mixed epoxy packs - or if you roll your own you can achieve a stiff peanut-butter consistency that will fill a 10mm gap.


This is the stuff that puts winches into decks of big sailboats - it's strong.


In the sketch, I show some small (say 25x80) cleats that you could cut from the same ply.
Wrap them in tape (strapping, masking, duct, cello - whatever you have) to stop them sticking to the glue.
Then screw them to the ply rectangle.
Trap a layer of tape between the cleat and the ply rectangle - that'll keep the ply level with the floor.


If it were me - I'd go to Burnsco and buy the smallest kit of WEST epoxy (2-parts - resin & slow hardener) and a small jug/bag of thickener powder. There are other brands of epoxy - I just like WEST and have used it for 40+ years. It's never let me down.


these two would do the job:
Epoxy kit 1L
Thickener 1L
A litre of resin and a litre of 413 filler should give you a litre+ of nice thick glue.
But _PLEASE DON'T_ mix it all together in one go !
(It will 'go off' way too fast for you to use it.)


For a little job like this, don't bother with pumps - your kitchen (digital scale will do fine).
Do use some gloves for working with epoxy - about 50% of people are not lucky like me - and get allergic to the stuff.
Skin rashes, etc - protect yourself or live dangerously... 


(a) get everything ready - you'll have 15 minutes to glue it all up.


(b) put 40 grams of resin into a paper cup or a Lisa's humus container.


(c) add 8 grams (1:5 ratio) of hardener  - and then stir while you count to 40.


(d) add two tablespoons of the 413 thickener and stir until the lumps have gone.
      If it's too runny - add more thickener.
      Don't be scared of making it too thick - that's hard to do.
      Better a bit thick than too runny.


(e) use your small brush / wooden coffee stick (whatever you've been stirring with) to
      'butter' the ply edges and a bit round the inside of the floor hole.


(f) drop/place the ply rectangle down into the hole and make sure the cleats have touched down.


(g) wipe any extra epoxy off the floor & ply - it will be 1000 times easier to wipe the epoxy up while un-cured than to wait until it has set up and you must sand off the rock-hard excess. Don't ask me how I know that.


(h) use up any extra epoxy to fill any voids in the crack between the ply and the floor.
      A rectangle of stiff cardboard or springy plastic (cut from a 2L tub of ice cream) make a good levelling tool / scraper to get a nice flat joint.


(i) Then go away and have a beer - come back tomorrow and take the cleats off and sand off any small lumps.
     If they're not small - go back and re-read (g) above. It's already strong enough to jump on.


In all of this - a roll of paper 'kitchen' towel can be a godsend, as can be an assistant to hand you stuff.
If you get some on you, white vinegar helps in cleaning it off hands etc. Time works well too ;-)


Rinse and repeat for the other vents. 


MikeAqua
8205 posts

Uber Geek
+1 received by user: 3958


  #3494463 21-May-2026 14:21
Send private message quote this post

eracode:


IMO a very tricky job to get the angle sections located with the positional accuracy that you would need to get this wholly right - working with pieces of angle and (presumably) a pop riveter down in the hole within 1mm accuracy.


How would you drill the holes in the duct for the rivets along the long side of the 100 mm wide opening - no room for the drill to fit in the cavity? Unless I’m missing something here.


Accuracy of hole placement would be achieved by using predrilled brackets to mark drilling points.  To me it looks like there is sufficient clearance for riveter at least longways. 


A simple spacer could be made of the plywood and use that to offset the brackets from the top edge.  With a little more effort and thought, a jig could be made to register across the opening and position brackets to allow holes to be marked/drilled I'd drill holes with a 90-degree drill head (ideally a dremel one), or with a Flexidrill.  Because the metal is thin, holes don't need to be drilled perfectly perpendicular.


It would be fiddly prick of a job. The results would be durable.


Mike


 1 | 2 | 3
Filter this topic showing only the reply marked as answer View this topic in a long page with up to 500 replies per page Create new topic


Geekzone Live »

Try automatic live updates from Geekzone directly in your browser, without refreshing the page, with Geekzone Live now.


Are you subscribed to our RSS feed? You can download the latest headlines and summaries from our stories directly to your computer or smartphone by using a feed reader.