|
|
|


Spending way too much time and money on Unraid servers!
Lenovo SR630: 2x Xeon Gold 5120, 384GB RAM, 2.4TB array, NVIDIA Tesla T4
Dell EMC Isilon NL410: 2x Xeon E5-2470 v2, 96GB RAM, 83.2TB array, NVIDIA Quadro K600
Dell PowerEdge R630: 2x Xeon E5-2640 v4, 384GB RAM, 1.2TB array, NVIDIA T400

|
|
|


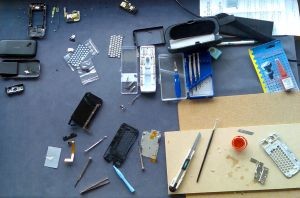 Despite this, on a Friday evening I sat down to take my fully functional G1 Dream apart. The first steps weren't overly tricky even though the kit didn't contain the required Philips #0 and #1 screwdrivers. The difficulty began when I realised the on-line instructions didn't cover disassembly to the level needed to replace the housing. The difficulty became critical when I discovered some key components weren't included in the housing kit.
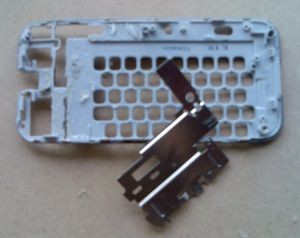 Problem the second. The G1 Dream keyboard is a moulded three dimensional plastic shell with a thin steel subframe bonded to it: the replacement keyboard didn't have the steel subframe.
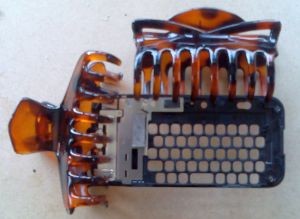 The existing bushes can be extracted by inserting a screw two or three turns into the bush and holding it with long-nosed pliers while applying a soldering iron to the top of the screw. When sufficiently heated the screw and attached bush can be smoothly withdrawn, and then inserted into the new housing with the same process. The amount of heat is critical, and so is the angle of insertion. I'm pleased to report I inserted three of the bushes 100% successfully. The fourth I didn't insert quite far enough, which meant the top of the screw sat proud when (three layered subsystems later) I tried to reassemble that part of the case. I cheated: rather than disassemble the entire phone again, I filed one millimetre off the tip of the screw.
 Overall, migrating the G1 Dream to a new housing was a long and fiddly process, and along the way I came to rue my decision to take on the challenge. Among its other signal ommissions the housing kit contained no gaskets, adhesive tabs or rubber shims. Some of these couldn't be salvaged from the original installation and for some, such as the touchscreen gasket, I was unable to devise an alternative. With no touchscreen gasket or camera lens coverthe phone internals are now exposed to dust they'd previously been spared.

