Geekzone: technology news, blogs, forums
Guest
Welcome Guest.
You haven't logged in yet. If you don't have an account you can register now.


neb

neb

11294 posts

Uber Geek
+1 received by user: 10018

Trusted
Lifetime subscriber

#299036 4-Aug-2022 19:27
Send private message

When the Casa rebuild was done, the builders poured a concrete pad up against the basement walls to put a 2000L water tank on. Tank width 1500mm, pad width 1600mm, with the tank hard up against the house walls along the side and at one end and inflow and outflow at the ends. This sounds fine until you think about it for a second...


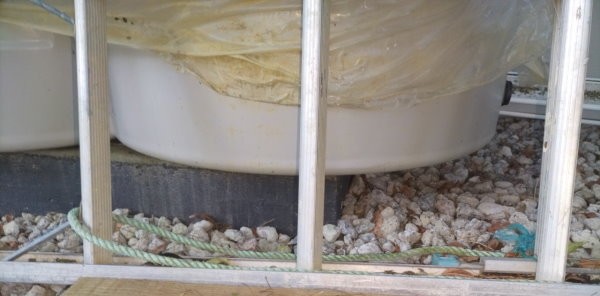
So now I need to extend the pad by maybe 150mm to allow space for the outflow pipe to the sump where the tank is up against the house wall. The pad looks like this:


The pad extension is just supporting the edge of the tank so doesn't have to carry much weight, problem is that it requires a ridiculously tiny amount of everything involved in concreting so it doesn't make much sense to use standard materials. What I was thinking of doing was running some 100-150mm masonry anchors into the existing pad, e.g. Ramset AnkaScrews, tying some cut-down D10 hook starter across the ends (because it comes in 1.2m lengths rather than 6m for reinforcing steel), and pouring the concrete around that. So that's $15 in steel and maybe another $20 in Cemix (for a volume of 1000 x 150 x 120 it looks like two 20kg bags should do it). That and the cheapest edger I can find...


Does that sound like a sensible way to do it?

View this topic in a long page with up to 500 replies per page Create new topic
 1 | 2
Jase2985
13730 posts

Uber Geek
+1 received by user: 6202

ID Verified
Lifetime subscriber

  #2950772 4-Aug-2022 20:42
Send private message

wack a paver or 2 under it and be done. could also use some small wooden/plastic shims to support the tank if the pavers dont quiet make the gap.


i think you are overthinking things


neb

neb

11294 posts

Uber Geek
+1 received by user: 10018

Trusted
Lifetime subscriber

  #2950798 4-Aug-2022 22:02
Send private message

Jase2985:

wack a paver or 2 under it and be done.


The thing is, I'm trying to move away from it being the Casa de Cowboy, not perpetuating it...

nickb800
2735 posts

Uber Geek
+1 received by user: 829

Trusted

  #2950828 5-Aug-2022 07:11
Send private message

Yeah AnkaScrews and D10 should do the trick. With the 150mm screws, put say 80mm in and leave 70mm sticking out - then rest your D10 on the screws against the head flange. That way there is a load path back into the main slab. Cable tie the D10 to the screws (assuming you have cable ties lying around home already), it just needs to hold everything in place while you pour the concrete. 


Most building merchants have a rebar cutter/bender in the yard with the 6m lengths of rebar - so if you go at a quiet time you should be able to cut down a 6m length and bend to suit (if you are adding an L-shaped bit of concrete, I wasn't sure from your post). 


I pretty much did exactly this around my house when I turned a garage into an extension of the house. I added a 150mm wide concrete nib/curb around the house, 150mm down from the finished floor level, to keep the garden away from the cladding and maintain cladding to ground clearance distances. 


Gordy7
gordy7
2001 posts

Uber Geek
+1 received by user: 505

ID Verified
Lifetime subscriber

  #2950836 5-Aug-2022 08:40
Send private message

If you want to make a really tidy job and not have pavers sink or joiners and extensions fail then rip up the slab and pour a new slab the size required.


Gordy


My first ever AM radio network connection was with a 1MHz AM crystal(OA91) radio receiver.


elpenguino
3576 posts

Uber Geek
+1 received by user: 2938


  #2950844 5-Aug-2022 09:06
Send private message

Gordy7:


If you want to make a really tidy job and not have pavers sink or joiners and extensions fail then rip up the slab and pour a new slab the size required.


That's right. Remove the tank and break up the old slab. Keep breaking as much of the existing house as you need to until you can make a tidy job of it :-)


Be awkward to excavate properly under the tank without removing it first.


Most of the posters in this thread are just like chimpanzees on MDMA, full of feelings of bonhomie, joy, and optimism. Fred99 8/4/21


Gordy7
gordy7
2001 posts

Uber Geek
+1 received by user: 505

ID Verified
Lifetime subscriber

  #2950852 5-Aug-2022 09:29
Send private message

elpenguino:


Gordy7:


If you want to make a really tidy job and not have pavers sink or joiners and extensions fail then rip up the slab and pour a new slab the size required.


That's right. Remove the tank and break up the old slab. Keep breaking as much of the existing house as you need to until you can make a tidy job of it :-)


Be awkward to excavate properly under the tank without removing it first.


Or move to another house :-)


Gordy


My first ever AM radio network connection was with a 1MHz AM crystal(OA91) radio receiver.


Shop now at Mighty Ape (affiliate link).
elpenguino
3576 posts

Uber Geek
+1 received by user: 2938


  #2950856 5-Aug-2022 09:40
Send private message

Gordy7:


elpenguino:


That's right. Remove the tank and break up the old slab. Keep breaking as much of the existing house as you need to until you can make a tidy job of it :-)


Be awkward to excavate properly under the tank without removing it first.


Or move to another house :-)


Always the easiest option !


Most of the posters in this thread are just like chimpanzees on MDMA, full of feelings of bonhomie, joy, and optimism. Fred99 8/4/21


nickb800
2735 posts

Uber Geek
+1 received by user: 829

Trusted

  #2950861 5-Aug-2022 10:05
Send private message

If you do it right then it should act as one slab and stay together for decades. Further options to over-engineer it include roughening the existing concrete where it meets the new concrete, and using a cheap (e.g. Cemix) bonding agent. Also make sure the surface is not proud of the existing slab, so it doesn't take a out-sized share of the tank's weight. And make the mix as dry as you can work with so shrinkage is minimised (otherwise that will encourage a crack at the join). 


Depends how the OP feels about doing a fiddly little new concrete job vs breaking up a larger slab and pouring a new one. Replacing with a new, larger slab is into the 'several wheelbarrow loads' territory of concrete which may be easy or very hard depending on the OPs experience (and state of their back!)


Bung
6733 posts

Uber Geek
+1 received by user: 2926

Subscriber

  #2950866 5-Aug-2022 10:31
Send private message

I've looked at the foundation requirements for several of that type of tank. Even though they all say pad to extend to edges of tank with that type of figure 8 design I doubt that cantilevered by 120mm would be a problem so anything would be cosmetic.

tweake
2641 posts

Uber Geek
+1 received by user: 1137


  #2950871 5-Aug-2022 10:49
Send private message

The typical way to extend a pad is to drill holes in on the edged, epoxy rebar in and then concrete around the tail of the rebar. You can also wash the concrete edge with cement paste which helps the new concrete bond with the old concrete.


neb

neb

11294 posts

Uber Geek
+1 received by user: 10018

Trusted
Lifetime subscriber

  #2950913 5-Aug-2022 12:59
Send private message

nickb800:

If you do it right then it should act as one slab and stay together for decades. Further options to over-engineer it include roughening the existing concrete where it meets the new concrete, and using a cheap (e.g. Cemix) bonding agent. Also make sure the surface is not proud of the existing slab, so it doesn't take a out-sized share of the tank's weight. And make the mix as dry as you can work with so shrinkage is minimised (otherwise that will encourage a crack at the join). 


Cool, thanks for that! The extension is just making one end 150mm longer so it'll be a single block 150mm x 1m wide. For that all I'll need is a straight maybe 90cm piece of reinforcing steel to run along the 1m length.


In terms of replacing the pad which someone else suggested, that'd (a) be a crazy amount of work and (b) nearly impossible to do, it was poured after the rest of the basement was done and the builders used up the leftover reinforcing steel that was lying around (I told them it had to support a 2 ton mass and let them get creative) so it's going to be almost impossible to break up. In any case it's completely unnecessary, I just need to extend the pad a bit at slightly better than the usual Casa de Cowboy level of workmanship.

HP


Shop now for HP laptops and other devices (affiliate link).

neb

neb

11294 posts

Uber Geek
+1 received by user: 10018

Trusted
Lifetime subscriber

  #2953589 11-Aug-2022 18:30
Send private message

I had some 8x100mm AnkaScrews left from another job and got a few 10x150s for the ends, for which I needed a 10mm masonry drill bit since the Bosch set I've got only goes up to 8mm. For that I had some general set that I'd inherited from somewhere, with fairly wide spade-type cutting heads. What I didn't know was that this was actually a unique self-tapering drill bit that started out as a 10mm bit and ended up an 8mm bit as drilling progressed:


The entire cutting head has simply vanished in the course of drilling two holes, it just looks like a twist drill now. In contrast the Bosch bit looks close to new.


Anyone know how good Sutton drills are?


Edited to add: Or there's the Bosch check-who's-paying-attention drill set.

tweake
2641 posts

Uber Geek
+1 received by user: 1137


  #2953594 11-Aug-2022 18:53
Send private message

sutton gear is pretty good.


Jase2985
13730 posts

Uber Geek
+1 received by user: 6202

ID Verified
Lifetime subscriber

  #2953606 11-Aug-2022 19:21
Send private message

what kind of drill are you using to drill the holes?


neb

neb

11294 posts

Uber Geek
+1 received by user: 10018

Trusted
Lifetime subscriber

  #2953609 11-Aug-2022 19:36
Send private message

Jase2985:

what kind of drill are you using to drill the holes?


Corded Bosch hammer drill (see the pattern set by the rest of the message :-).

 1 | 2
View this topic in a long page with up to 500 replies per page Create new topic


Geekzone Live »

Try automatic live updates from Geekzone directly in your browser, without refreshing the page, with Geekzone Live now.


Are you subscribed to our RSS feed? You can download the latest headlines and summaries from our stories directly to your computer or smartphone by using a feed reader.