Geekzone: technology news, blogs, forums
Guest
Welcome Guest.
You haven't logged in yet. If you don't have an account you can register now.


OmniouS

423 posts

Ultimate Geek

Trusted
Lifetime subscriber

#214294 5-May-2017 12:11
Send private message

Part one of our UFB install went well - the Chorus installers were able to use the existing conduit so we ended up with a very tidy outside installation.


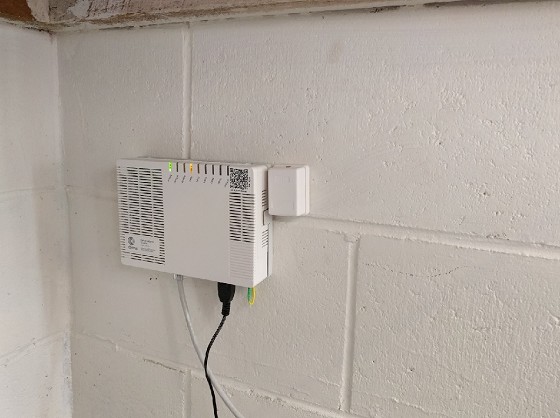
I asked for the ONT to be placed on the concrete wall in the garage. The guys told me that where I wanted it would be higher than what was usually allowed but it shouldn't be a problem.


They asked me to mount a block of wood on the wall for the ONT. Just wondering if there is a recommended thickness for the block, and if there was a mounting guide that I could print? I got the length and width measurements from http://ufb.org.nz/faq/


Cheers


Create new topic
JamesN
108 posts

Master Geek


  #1776226 5-May-2017 13:20
Send private message

The Chorus person should be able to mount it straight on to the concrete as when our ONT got installed in my unit, It was mounted straight in to the concrete blocks.


Also the same from the fibre to the distribution point where the fibre is split of to the other units.


Behodar
10501 posts

Uber Geek

Trusted
Lifetime subscriber

  #1776228 5-May-2017 13:23
Send private message

Mine's also directly on the concrete wall in the garage.


OmniouS

423 posts

Ultimate Geek

Trusted
Lifetime subscriber

  #1776248 5-May-2017 13:44
Send private message

The orange mark on the right wall where i want to put the ONT. The old cupboards are going, and I'm planning to put in a wall mount swing rack where the red mark is.


The dangling CAT6 cable in the pic is a temporary run to a modem sitting on a workbench across the room


Click to see full size


itxtme
2102 posts

Uber Geek


  #1776378 5-May-2017 15:25
Send private message

Mine is mounted directly to the concrete block wall, a piece of wood I guess makes it easier for them, only wood screws required.  Tell them to mount it directly, so you get a nice flush finish.


OmniouS

423 posts

Ultimate Geek

Trusted
Lifetime subscriber

  #1779305 10-May-2017 20:21
Send private message

Update - the second part of the installation took place today. They were able to mount it on the wall where I wanted it


Click to see full size


I didn't notice this until afterwards but the cable entry point looks quite messy:


Create new topic


News and reviews »

Air New Zealand Starts AI adoption with OpenAI
Posted 24-Jul-2025 16:00


eero Pro 7 Review
Posted 23-Jul-2025 12:07


BeeStation Plus Review
Posted 21-Jul-2025 14:21


eero Unveils New Wi-Fi 7 Products in New Zealand
Posted 21-Jul-2025 00:01


WiZ Introduces HDMI Sync Box and other Light Devices
Posted 20-Jul-2025 17:32


RedShield Enhances DDoS and Bot Attack Protection
Posted 20-Jul-2025 17:26


Seagate Ships 30TB Drives
Posted 17-Jul-2025 11:24


Oclean AirPump A10 Water Flosser Review
Posted 13-Jul-2025 11:05


Samsung Galaxy Z Fold7: Raising the Bar for Smartphones
Posted 10-Jul-2025 02:01


Samsung Galaxy Z Flip7 Brings New Edge-To-Edge FlexWindow
Posted 10-Jul-2025 02:01


Epson Launches New AM-C550Z WorkForce Enterprise printer
Posted 9-Jul-2025 18:22


Samsung Releases Smart Monitor M9
Posted 9-Jul-2025 17:46


Nearly Half of Older Kiwis Still Write their Passwords on Paper
Posted 9-Jul-2025 08:42


D-Link 4G+ Cat6 Wi-Fi 6 DWR-933M Mobile Hotspot Review
Posted 1-Jul-2025 11:34


Oppo A5 Series Launches With New Levels of Durability
Posted 30-Jun-2025 10:15


Geekzone Live »

Try automatic live updates from Geekzone directly in your browser, without refreshing the page, with Geekzone Live now.


Are you subscribed to our RSS feed? You can download the latest headlines and summaries from our stories directly to your computer or smartphone by using a feed reader.